
Last updated on November 1, 2026 at 9:01 AM
Before creating your first Meta campaign, connect the people, brand identities, ad account and business data that the campaign will use. This tutorial explains what each object does, how to configure it, and how to check that the connections actually work.
Follow the steps in order when setting up a new business. If you are taking over an existing account, inventory its owners and IDs first. Creating another Page, pixel or catalog often makes an access problem harder to solve.
About the screenshots: The interface examples below come from the tutorials supplied with the original guide; each image credits its source. They are not screenshots of your account. English labels and existing annotations are retained. Menus vary by region, eligibility and interface version; verify the object name, ID, owner and permissions in your own account.
Choose your setup path before creating assets. If you are taking over an existing account, inventory its owners, IDs and connections first. Website purchases, instant-form leads, messages and app promotion use different destinations; section 13 helps you identify the assets your campaign needs. You do not need every asset in this guide for every campaign.
1. Separate ownership, access, connections and data transmission
A personal login identifies the operator. A business portfolio organizes business assets and permissions. The Facebook Page and Instagram account provide the public brand identity. The ad account contains campaigns and billing. Datasets receive business events, while catalogs store product information.
| Relationship | What it means | Example |
|---|---|---|
| Ownership | Which business controls the asset over time. | The brand owns its ad account. |
| Access | Who can perform particular tasks. | An agency can manage ads without owning the account. |
| Connection | Which assets can work together. | An ad account can use a dataset; a catalog connects to an event source. |
| Transmission | How events reach Meta. | The pixel sends browser events; Conversions API sends server or partner events. |
Check each relationship separately. Agency access to an ad account does not automatically provide access to the Page, Instagram account, dataset or catalog needed for the same campaign.
2. Keep an inventory of the core assets
| Object | Purpose | Record these details |
|---|---|---|
| Facebook personal account | A person’s login and authorization identity; it is not the brand’s Page. | Operator, recovery methods and two-factor authentication status. |
| Facebook Page | The public Facebook presence and an advertising identity. | Name, Page ID, owner and access. |
| Instagram professional account | The Instagram brand presence. Linking to a Page and assigning business access are separate tasks. | Username, account type, linked Page and permissions. |
| Business portfolio | The organizational container for assets and permissions; older guides often call it Business Manager or BM. | Portfolio ID, business information and people with full control. |
| Ad account | Campaigns, spending, payment settings and reporting. | Account ID, owner, currency, time zone and payer. |
| Dataset and Meta Pixel | The dataset manages event data. The pixel is a browser-based collection method for website events. | Dataset/pixel IDs, owner, connected ad accounts and installation. |
| Conversions API (CAPI) | A server, platform or CRM connection that sends events; it is not another ad account. | Integration, destination ID, maintainer and deduplication method. |
| Catalog and product sets | Product records and selected subsets used for product advertising. | Catalog ID, primary feed, refresh schedule and item ID convention. |
Business Suite, Ads Manager, Events Manager and Commerce Manager are working interfaces, not interchangeable account types. Use business settings for access, Ads Manager for campaigns, Events Manager for event diagnostics, and Commerce Manager for catalogs and commerce features.
3. Secure individual logins before adding assets
- Use each operator’s own authorized login. Check recovery email and phone details, enable two-factor authentication, and keep recovery information secure.
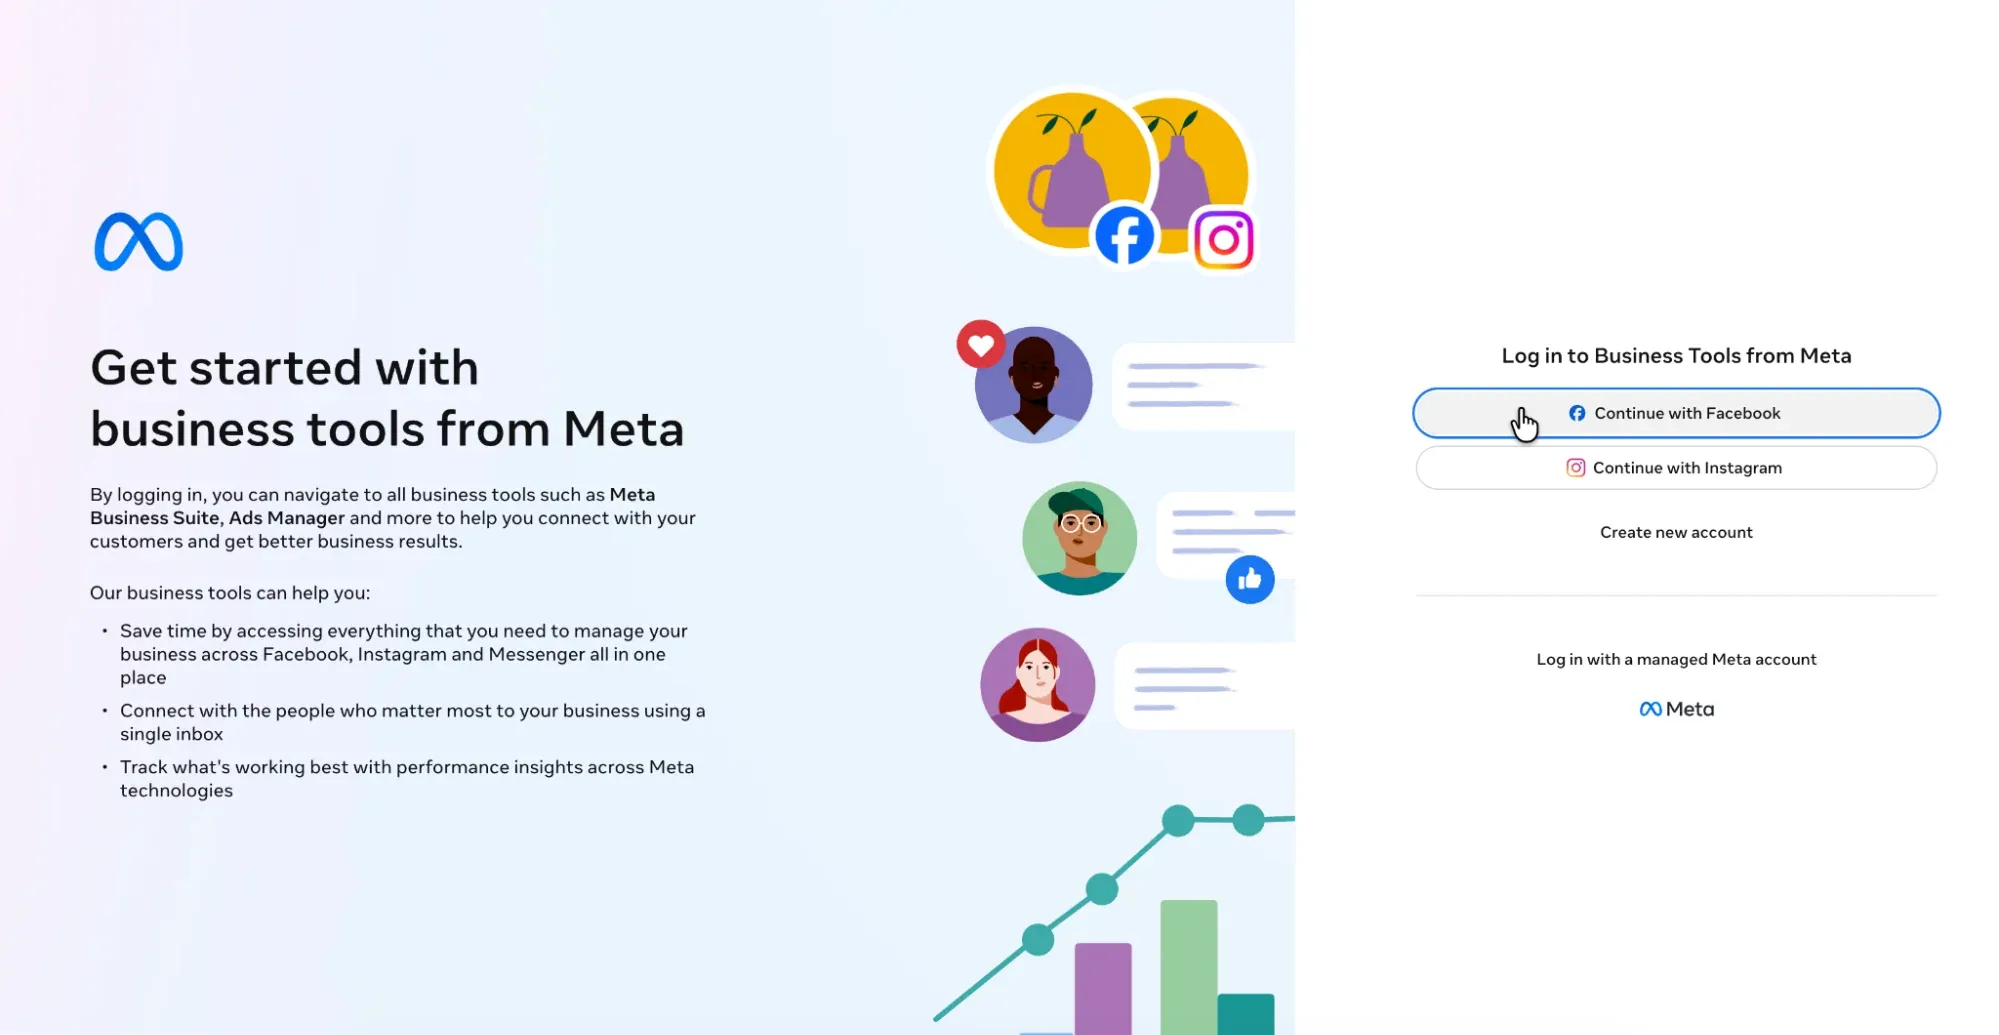
- Open the business tools and confirm the selected portfolio before creating anything. If your organization uses managed Meta accounts, follow its work-account process.
- Accept the business invitation, then verify that the required assets are actually visible. A successful login does not mean asset access is complete.
- Keep reliable administrative coverage. As an operational precaution, appoint at least two trusted current staff members who can independently sign in and manage the business.
Do not hand over a personal Facebook account when an employee leaves. Reassign business permissions instead. Shared passwords, rented portfolios and purchased accounts create ownership and recovery problems.
4. Create or verify the business portfolio
- Check whether the business already has a portfolio. Obtain authorized access to that portfolio before deciding to create another.
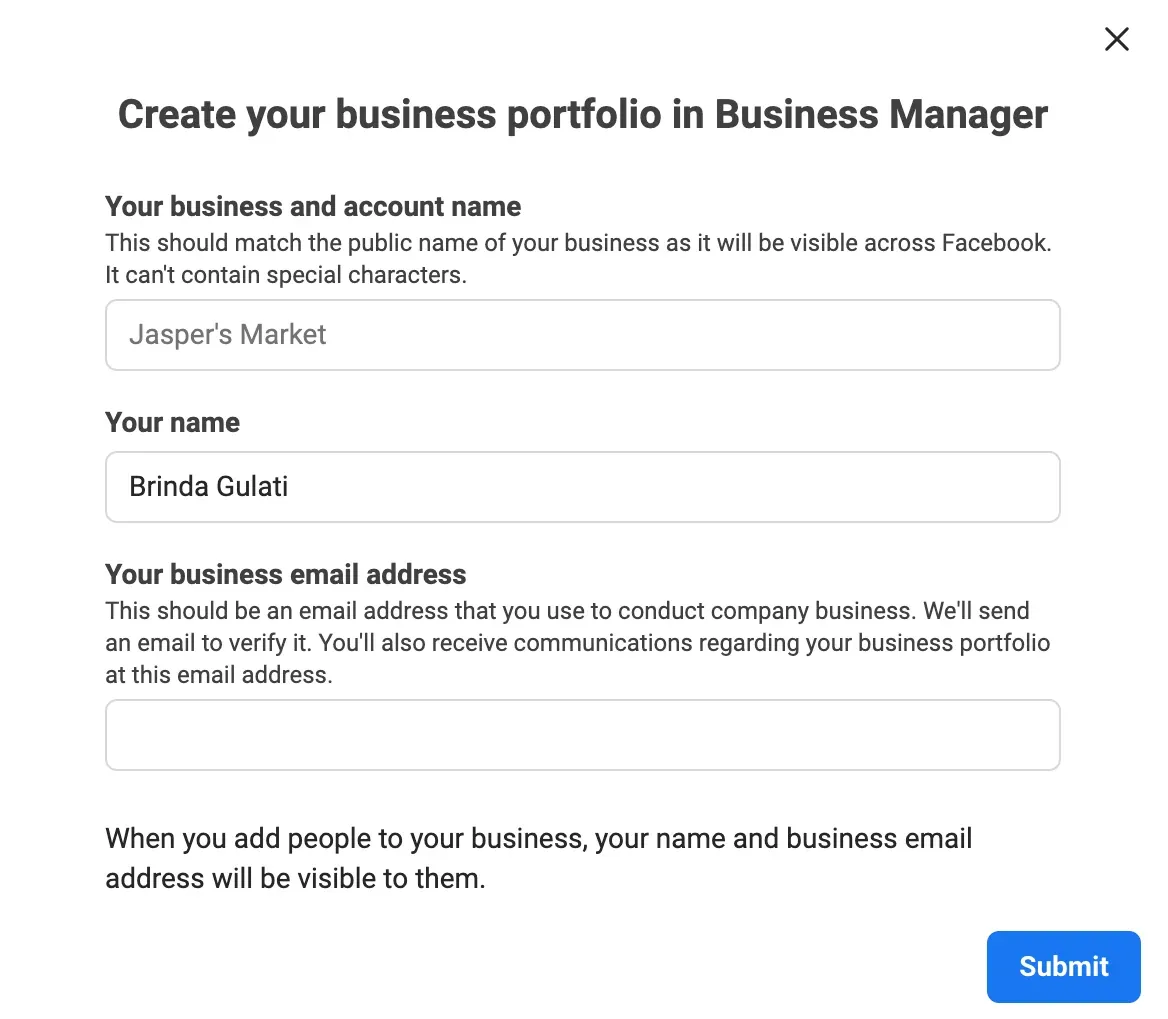
- When a new portfolio is needed, enter the real business name, responsible person and business email in Business Suite; complete the confirmation requested by Meta.
- Open Business portfolio info or Business info. Record the portfolio ID and check the business details.
- Review full-control access and security settings, then add the assets the business should own. Complete business verification when required for the relevant feature or account.

A portfolio ID, Page ID, ad account ID and pixel ID identify different objects even when they all look like long numbers. Providing an agency with a portfolio ID does not itself grant access.
5. Connect the Facebook Page and Instagram identity
- Create or identify the brand’s Facebook Page. Check its owner and your Page access before creating a duplicate.
- Use an appropriate Instagram professional account type. A business account is a common choice for a brand; choose according to the available features and business needs.
- Connect the Page and Instagram account through the relevant linked-account settings. Then check both objects under Pages, Instagram accounts or Business assets.
- Assign the necessary Page and Instagram tasks to people or partners, and complete any required ad-account connection.
- In an ad draft, select the intended Page and Instagram identity and inspect the preview.
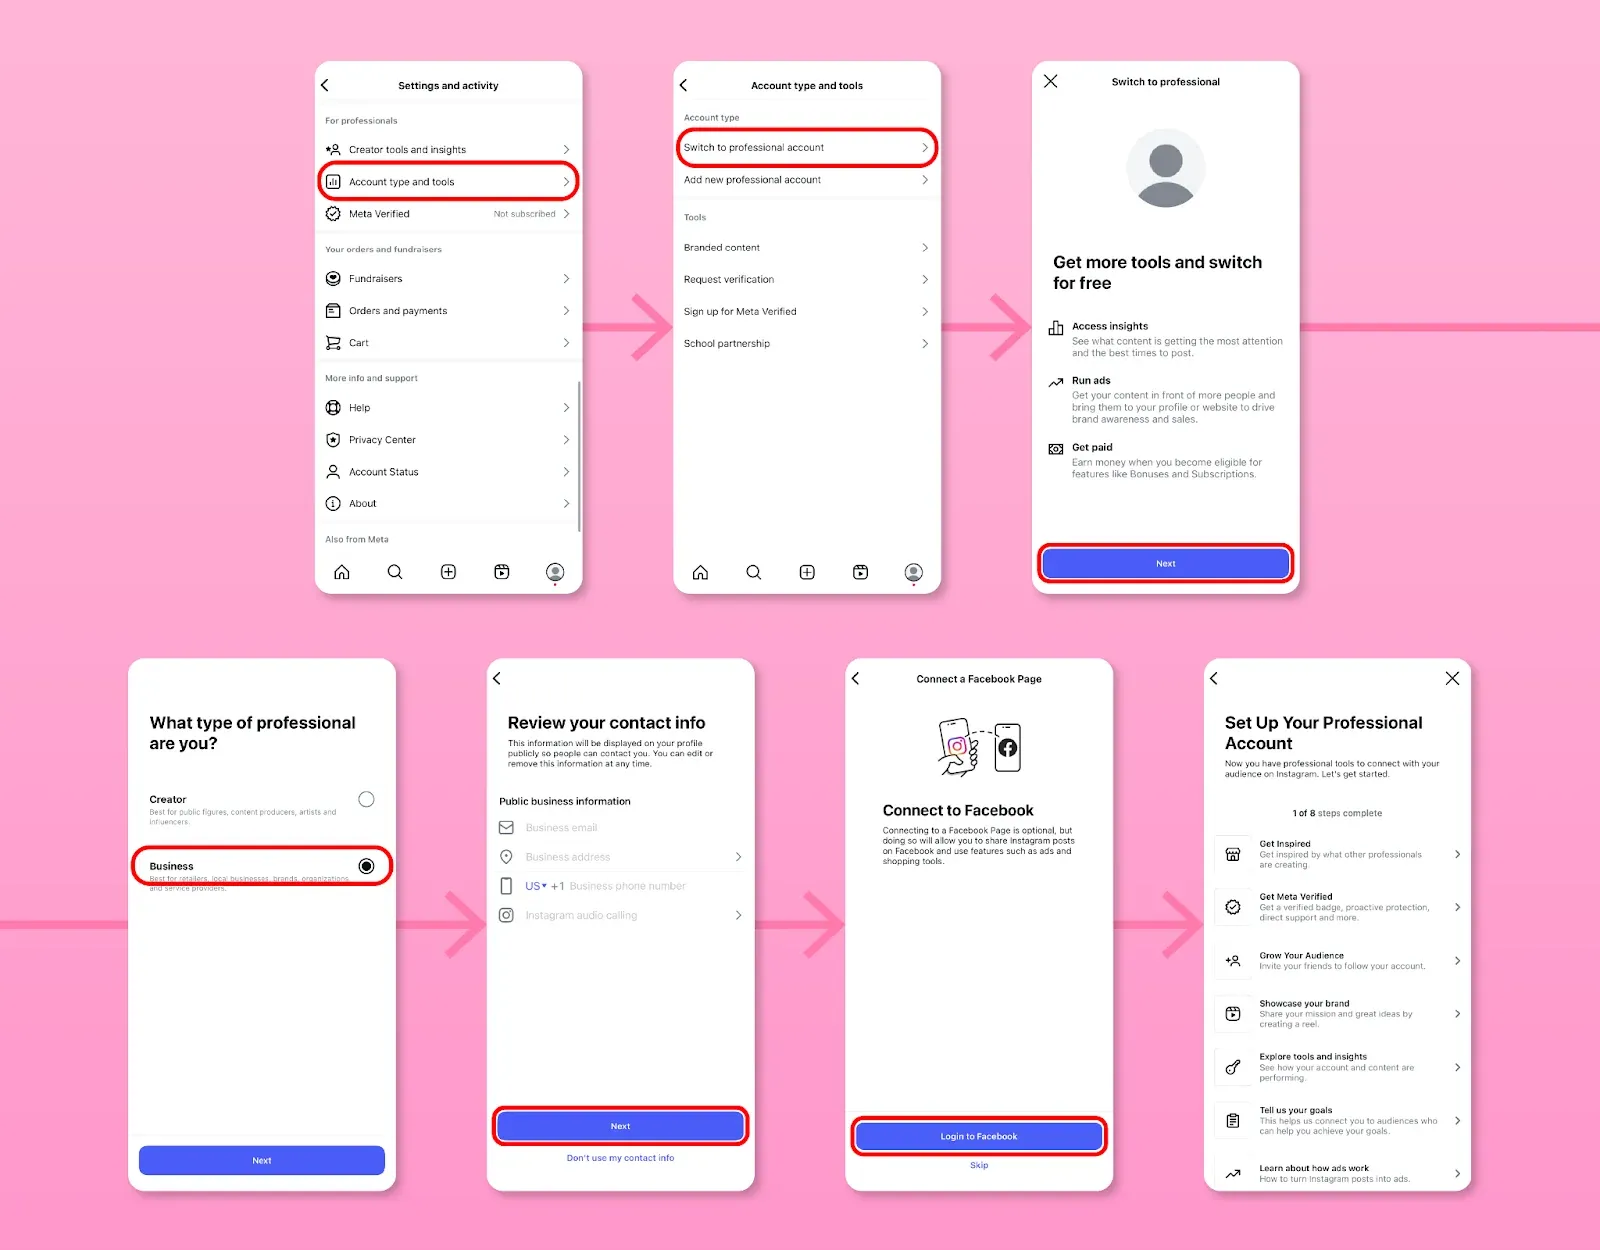
Linking the identities, adding them to a portfolio, and allowing a person or ad account to use them solve different problems. Some advertising flows support other identity options; this is the usual configuration for a brand managing both channels.
6. Set up the ad account and billing
| Action | Use it when | Check first |
|---|---|---|
| Create an account | The business genuinely needs a new advertising account. | Intended owner, currency, time zone and payment responsibility. |
| Add or claim an existing account | Your business owns an eligible existing account. | Current owner, eligibility and consequences of claiming it. |
| Request shared access | An agency or another business needs to manage someone else’s account. | The owner approves the required permissions and retains ownership. |
- In business settings, open Accounts → Ad accounts or the equivalent asset entry. Record the account ID and owner.
- Confirm currency and time zone before creation. They affect billing and reporting; changes can have account-level consequences rather than behaving like a simple profile edit.
- In Billing and payments, add a supported payment method and the appropriate billing and tax details. Confirm who is responsible for payment.
- Assign operators, set appropriate spending controls, and review account status. Payment methods and account limits depend on the region and account.
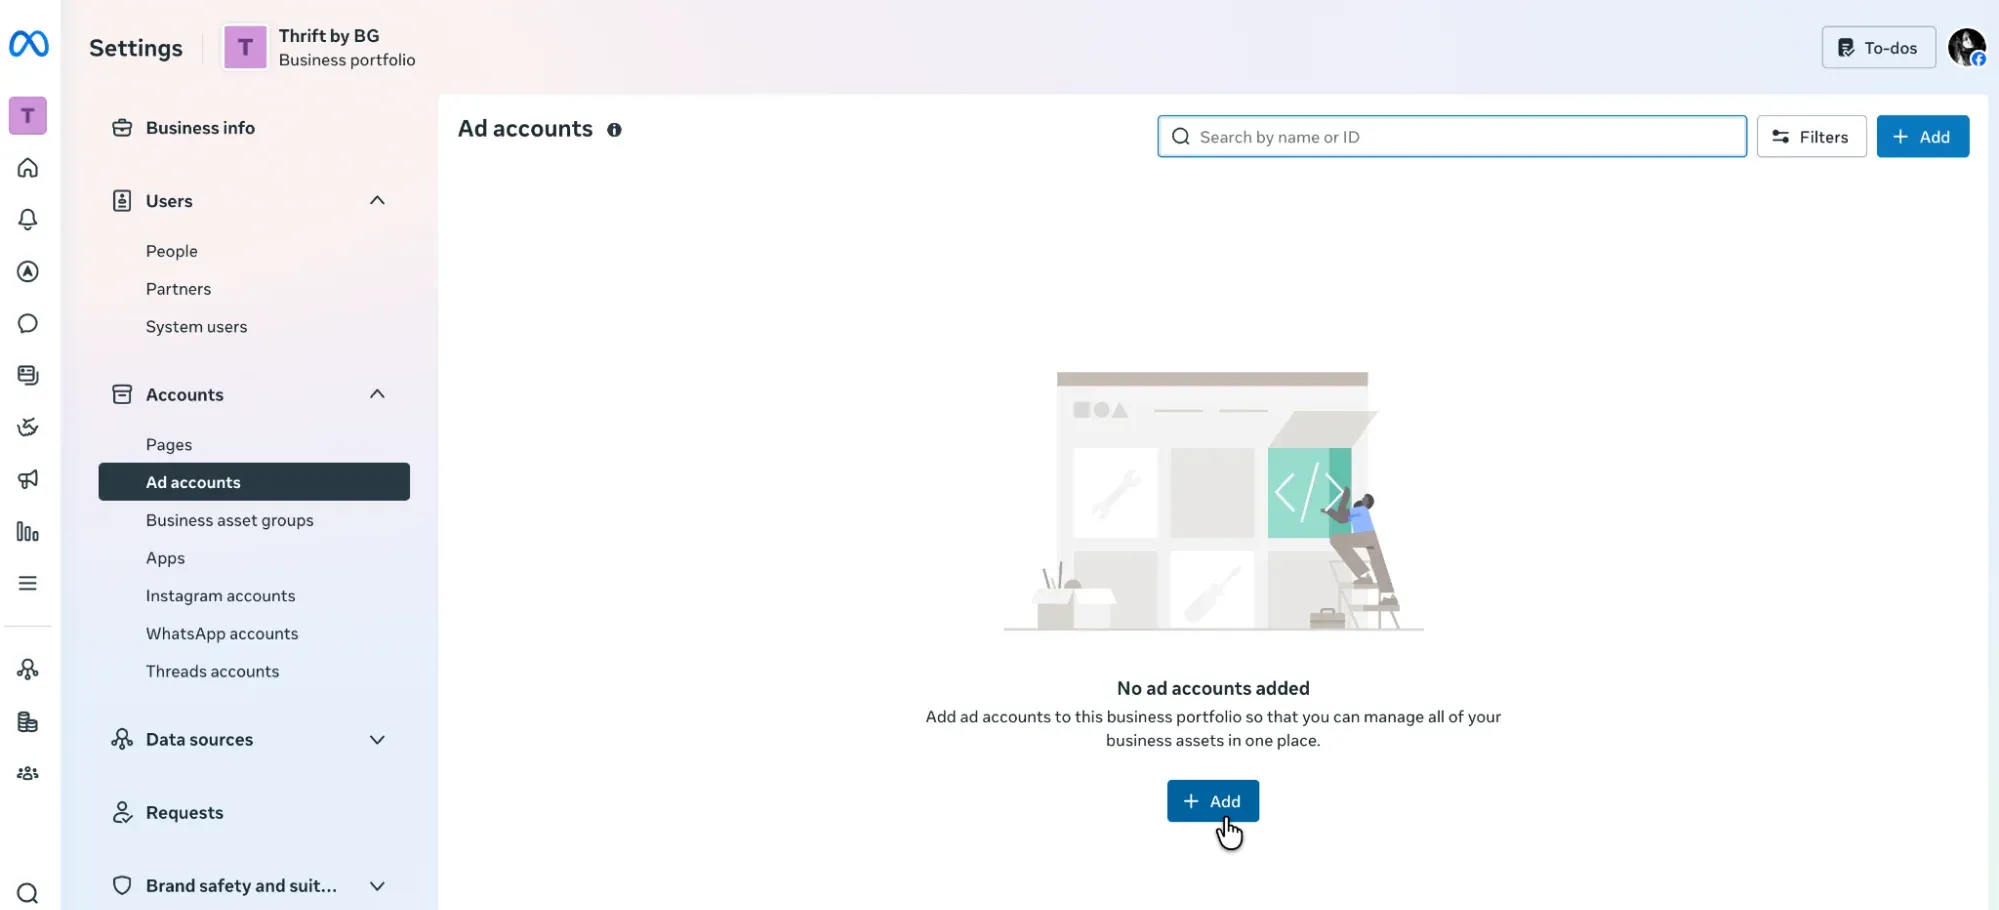
Selling in several countries does not automatically require one ad account per country. Design the structure around billing entities, currencies and operational needs. Ownership changes, removals and transfers have asset-specific restrictions; check before claiming an account.
7. Grant people and agencies the access they need
Permissions have two layers: portfolio access and tasks on each individual asset. After inviting a person, assign the actual Page, ad account, dataset or catalog they need.
| Role | Typical access | Avoid granting by default |
|---|---|---|
| Business owner | Necessary full control, people and security administration. | Access to unrelated businesses. |
| Media buyer | Campaigns, reports, required identities and event sources. | Portfolio-wide full control. |
| Content operator | Page/Instagram publishing, messages and insights. | Billing administration and API credentials. |
| Finance | Required billing, transactions and payment tasks. | Publishing or pixel configuration. |
| Developer or analyst | Required datasets, integrations and diagnostics. | Unrelated content and every ad account. |
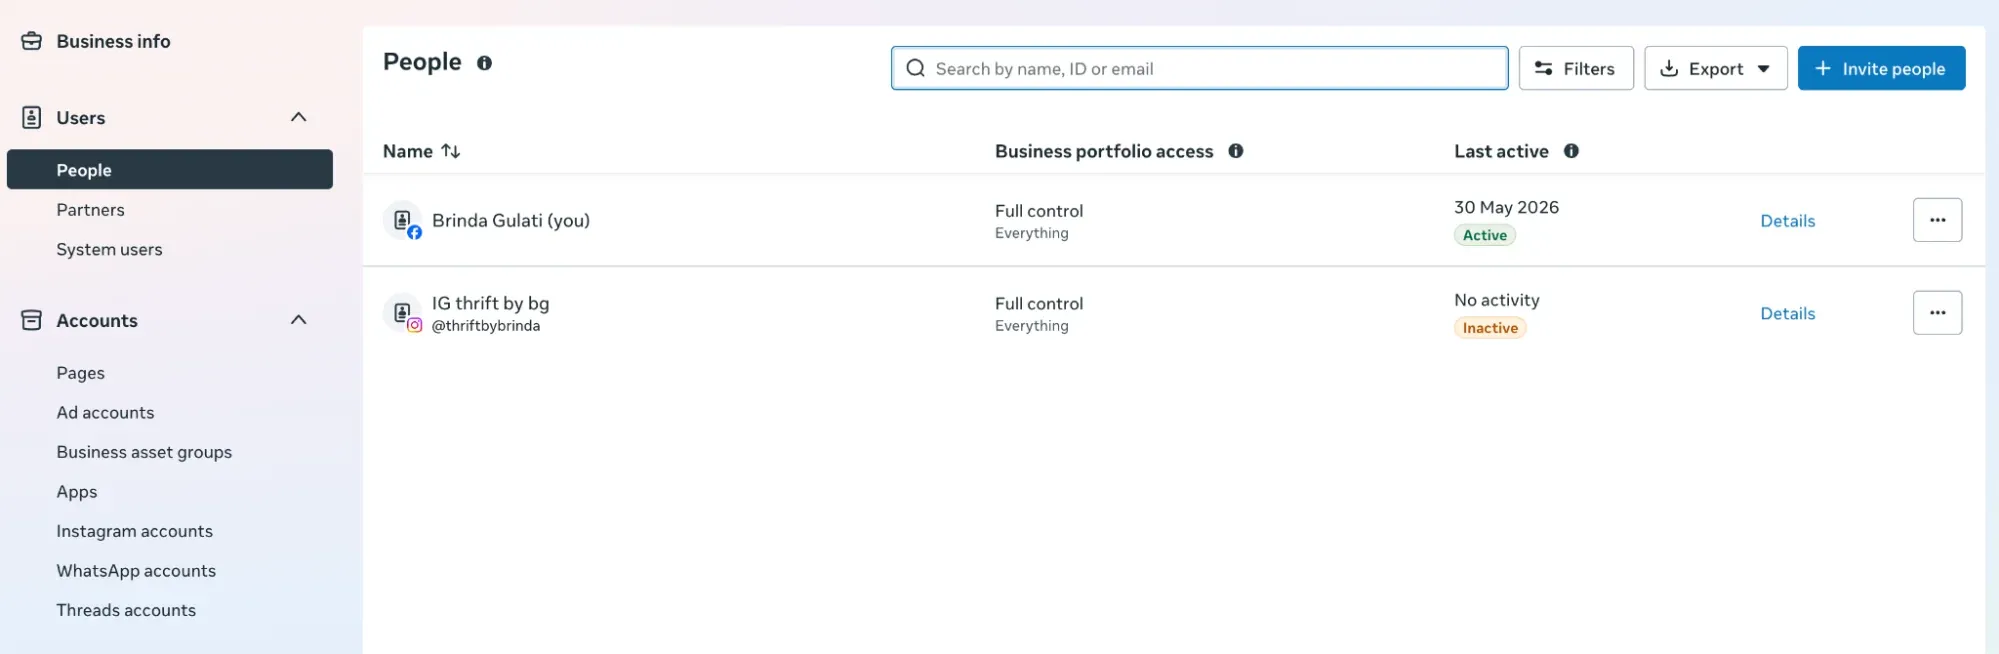
- Under People, invite the colleague with the appropriate portfolio access level.
- Select the assets and task permissions, then have the colleague accept.
- Ask them to perform their actual work using their own login. Review access again after role changes.
Connect an agency as a partner
- Confirm the brand’s and agency’s portfolio IDs through the agreed contacts.
- Use Partners to share selected assets, or review and approve the agency’s access request.
- Grant the required ad account, Page, Instagram, dataset and catalog tasks individually.
- Have the agency test the advertising identity, optimization event and catalog.
- When the engagement ends, review active ads, billing, integrations and credentials before removing the former access.
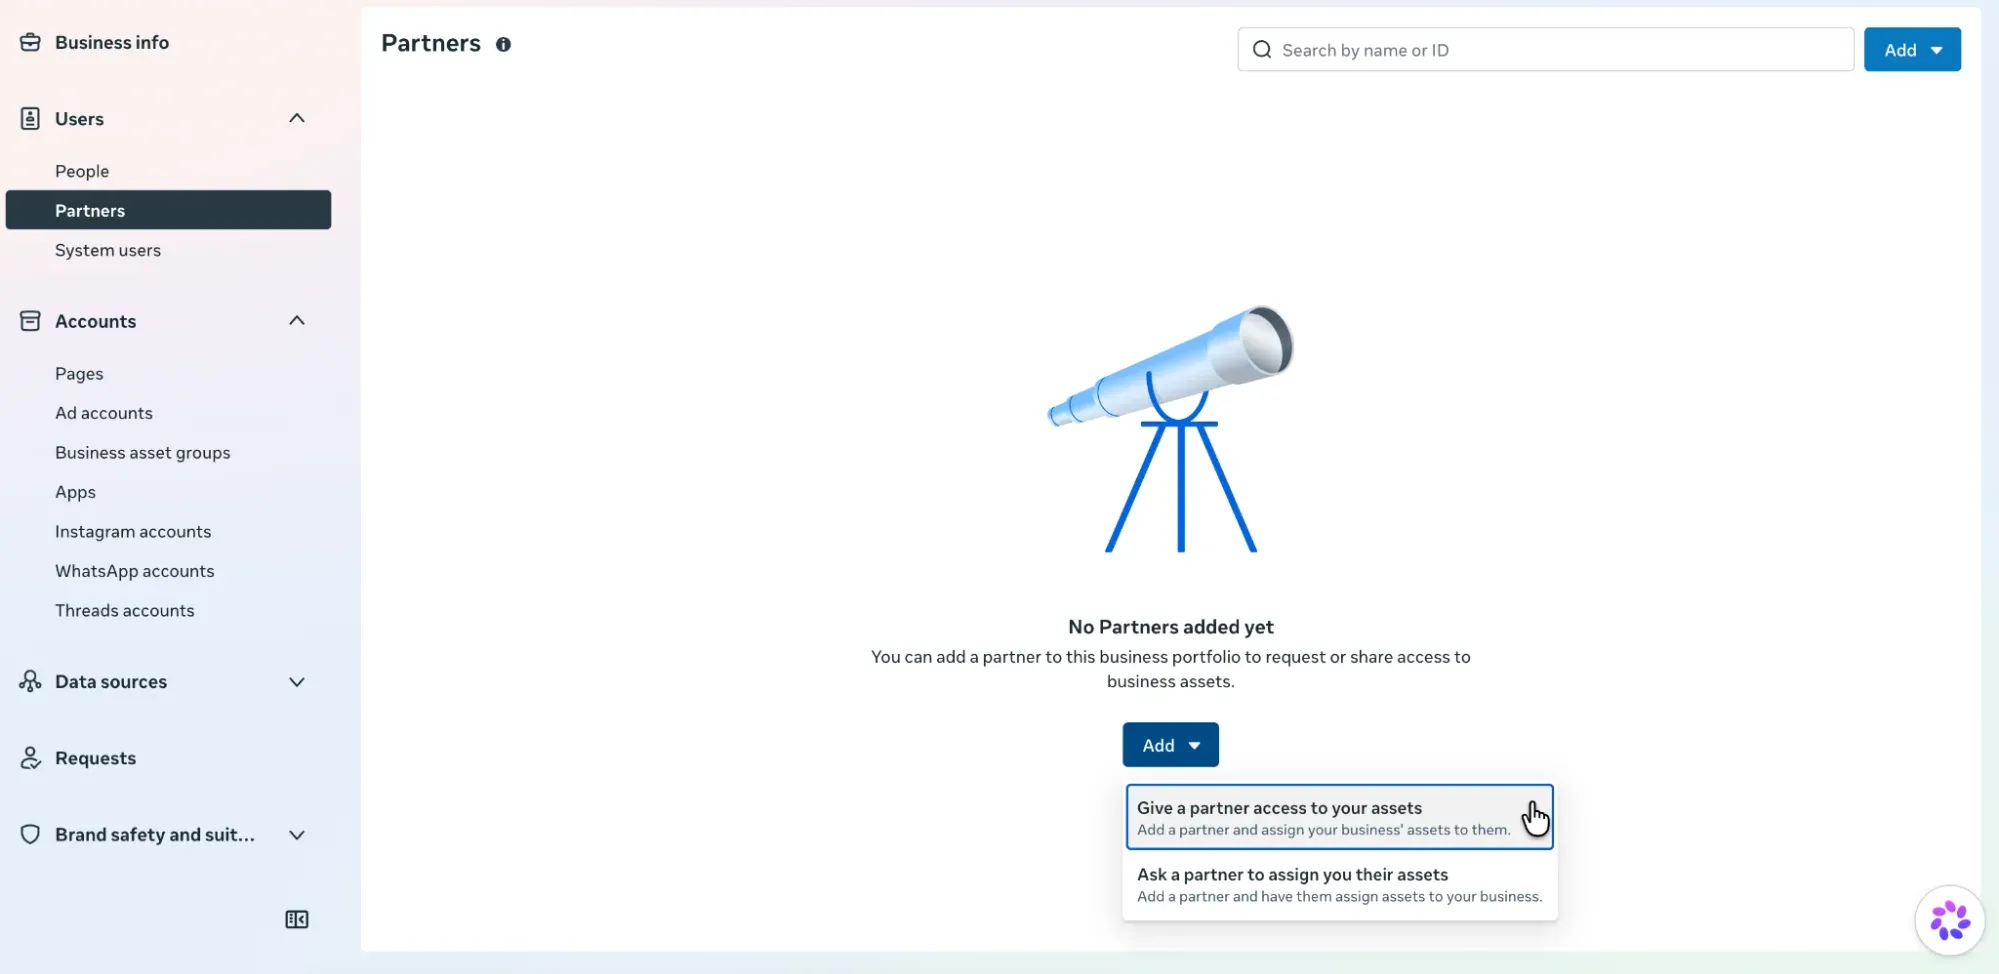
An agency normally assigns its own employees after receiving partner access. The brand does not need to share its Facebook password. Partner access grants usage rights; it is not an ownership transfer.
8. Connect the dataset and pixel to your website
- In Events Manager or Data sources, identify any existing dataset or pixel. Verify its ID and owner.
- If a new source is needed, follow Connect data → Web or the available dataset flow. Some pixel-to-dataset transitions retain the ID, but not every dataset is simply a website pixel.
- Choose one primary integration: an official commerce channel, a supported partner, or a maintained custom installation. Audit themes, tag managers, apps and old plugins for duplicate tracking.
- Configure the relevant business events and give the intended ad account access to the dataset.
- Run a controlled user journey, then confirm the dataset and optimization event can be selected in the campaign configuration.
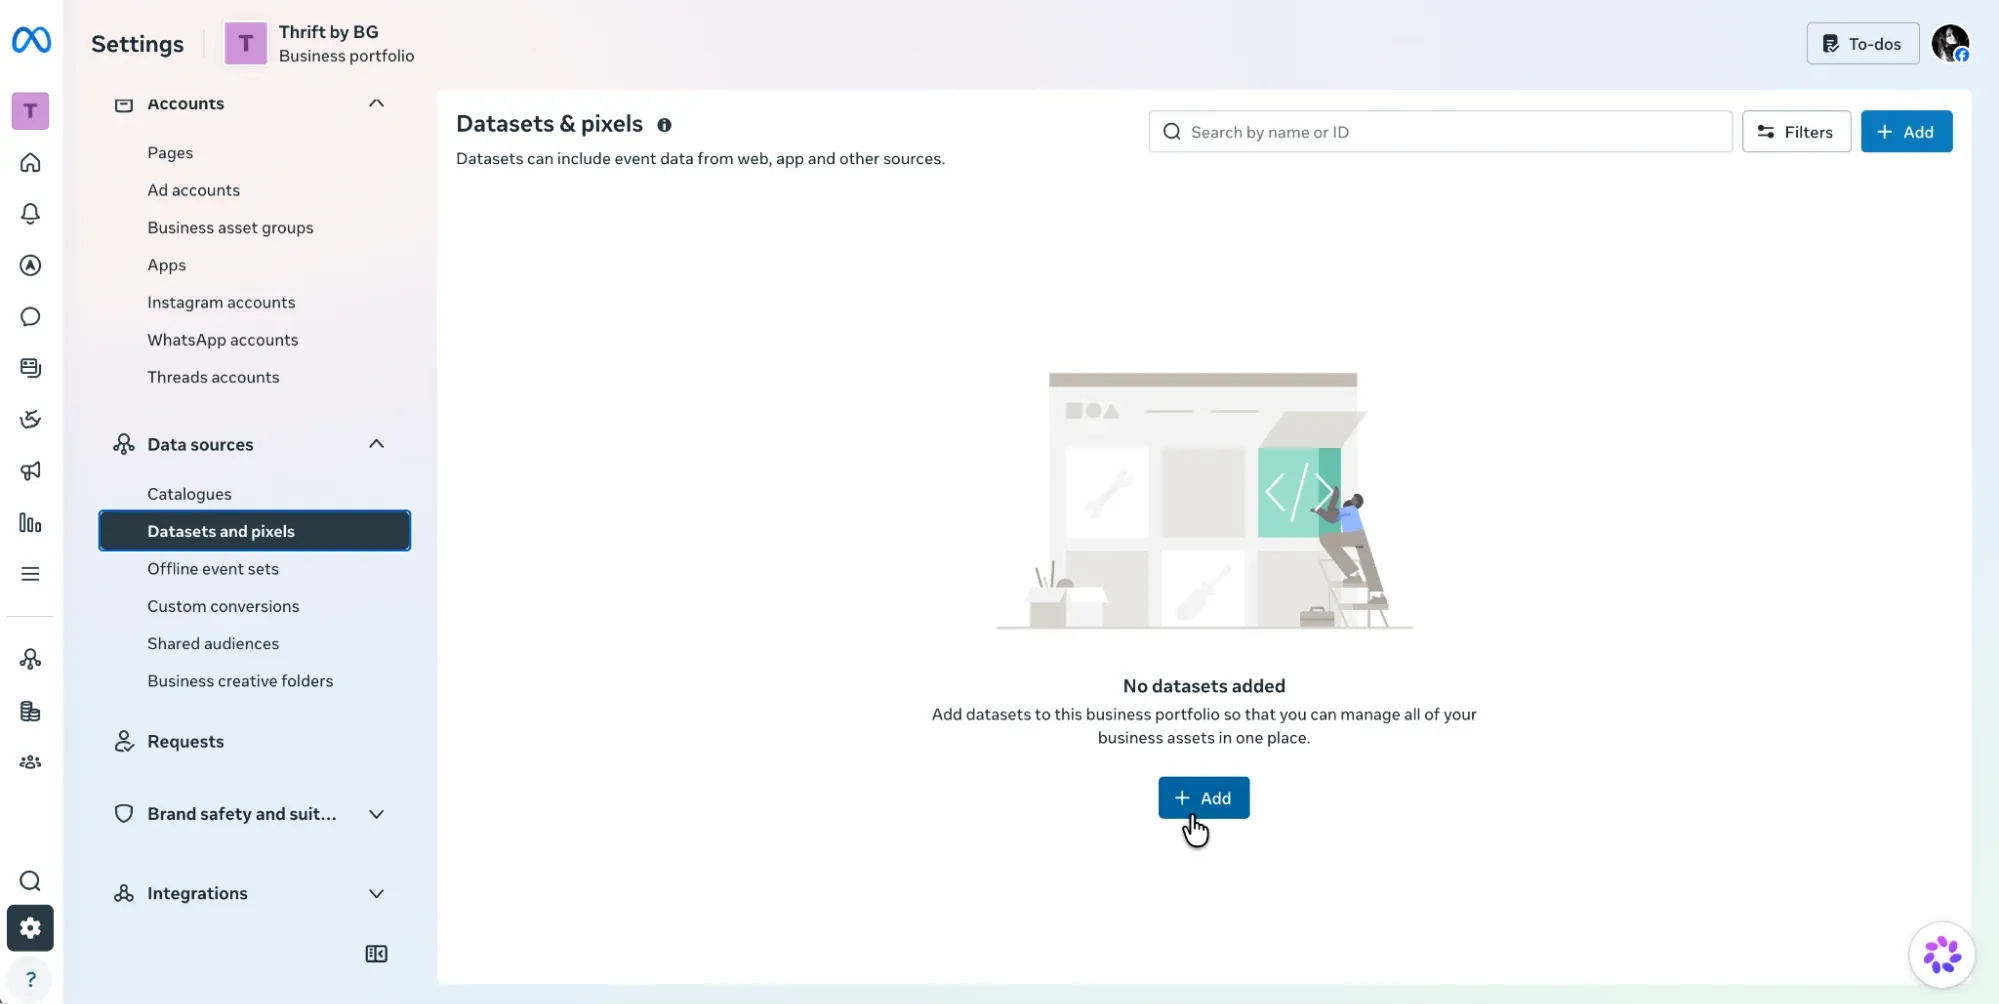
PageView only confirms that a page event arrived. It does not validate purchases, lead submissions, amounts or currencies. Pixel Helper mainly inspects the browser side and cannot independently confirm server-side CAPI delivery.
9. Choose a Conversions API implementation
| Approach | When it fits | What to maintain |
|---|---|---|
| Platform or partner integration | A supported commerce platform such as Shopify. | Connected assets, data-sharing settings, event behavior and diagnostics. |
| An available Meta setup option | Your account offers a suitable managed or guided configuration. | Eligibility, event coverage and the option’s operating requirements. |
| Direct integration | A custom website, CRM or specialized purchase flow. | API parameters, credentials, retries, deduplication and monitoring. |
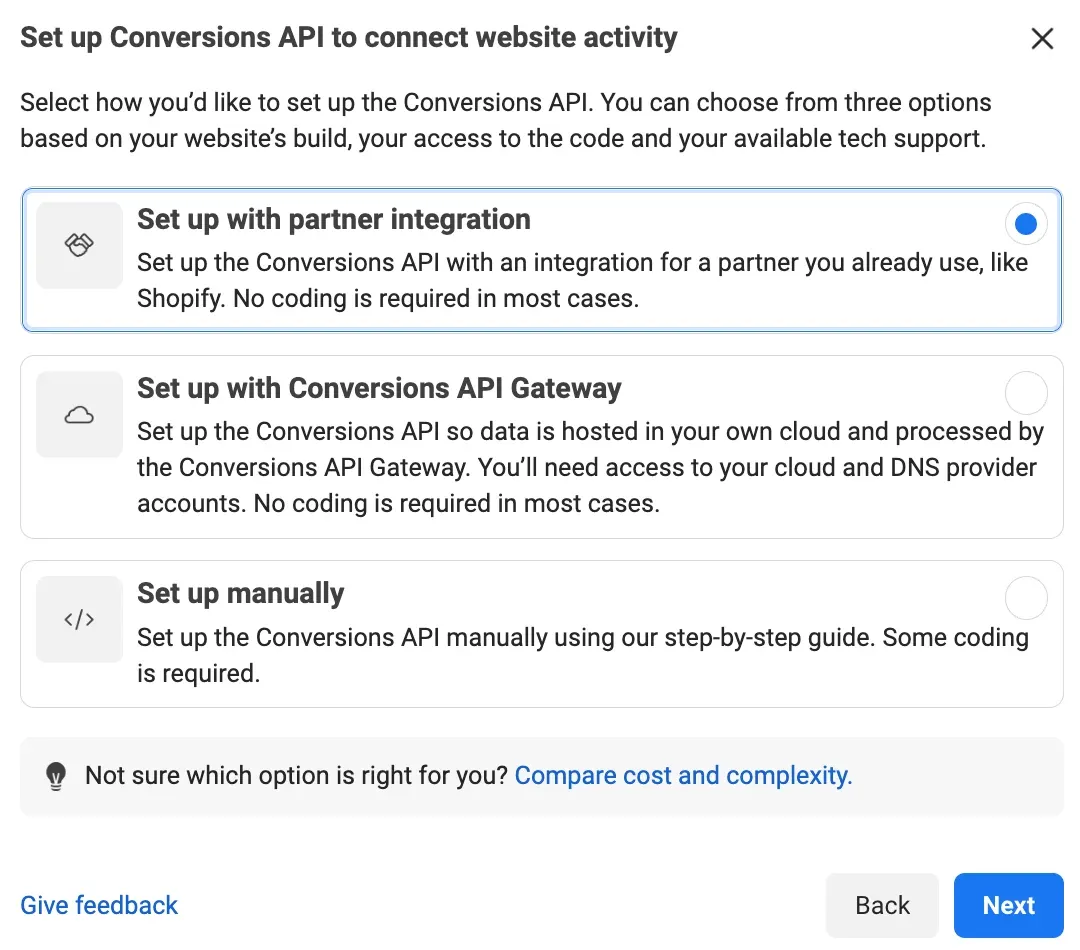
Send events to the correct dataset and assign a maintainer. Direct integrations must follow the current event specification, including event name, time, source, business parameters and permitted matching fields. Keep access tokens server-side or in a secrets manager. A partner integration does not necessarily require you to create your own app or system user.
CAPI complements browser collection; it does not remove the need to handle consent and user choices. Plan deduplication whenever both paths report the same action.
10. Follow the right setup path for your store
Shopify: use the official Facebook & Instagram channel
- Check the channel requirements: the connecting Facebook user needs full control of the relevant portfolio and Page, and the selected portfolio must own that Page. The Page must be published. The store must not be private and must have a valid sender email. Other connected assets also need the required permissions.
- Before enabling another connection, review existing theme code, custom pixels, tag-manager tags and apps. Identify which installation sends each event so that the new connection does not introduce duplicate senders.
- Install or open Facebook & Instagram by Meta. Verify the selected portfolio, Page, Instagram account, ad account, dataset/pixel and catalog by ID.
- In Shopify, open Sales channels → Facebook & Instagram → Settings → Data sharing settings. Enable Customer data sharing and choose the appropriate level for your data-processing arrangements. If no Pixel is connected, select the intended existing Pixel and click Connect or Confirm, as shown in your interface.
- Compare the connected Pixel ID with your asset register. Save, reopen the settings to confirm the connection, then run the controlled order test in section 11.
If another employee can see the channel but it appears disconnected, check that employee’s authorization first. Shopify requires staff who use this channel to connect their own Facebook account with full control of the associated portfolio and Page. This channel requirement does not mean every advertiser or agency needs full control of all business assets.
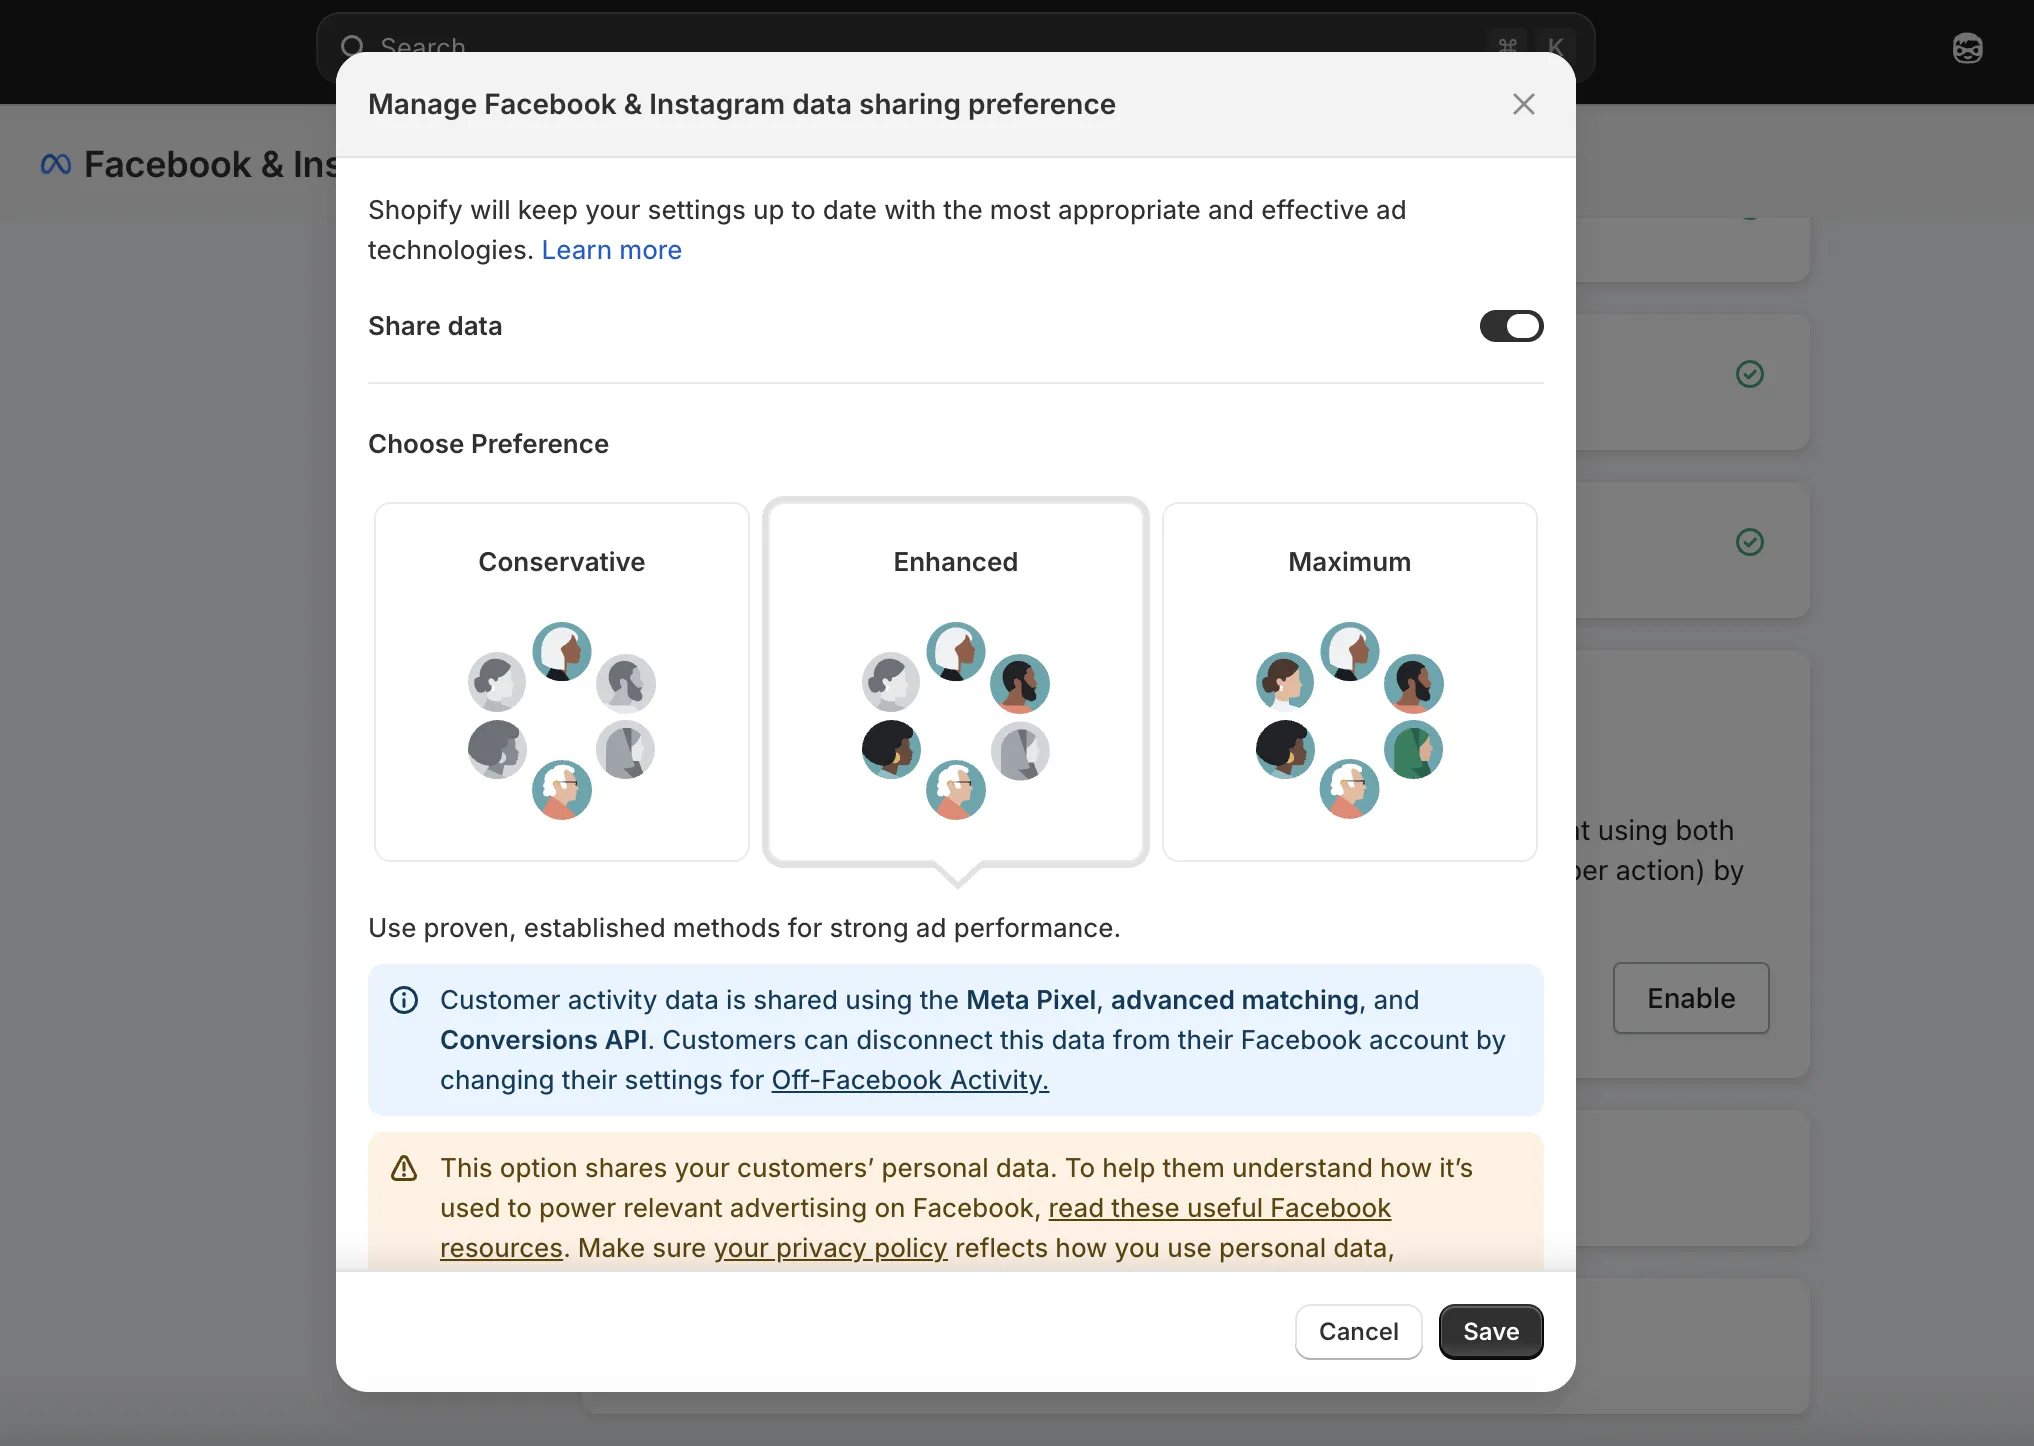
| Level | Core behavior described by Shopify |
|---|---|
| Standard | Browser-based Meta Pixel. |
| Enhanced | Meta Pixel plus CAPI; server-to-server Purchase data and additional customer information for matching. |
| Maximum | Meta Pixel plus CAPI and updates using Meta’s latest advertising technology; available settings depend on the installation and current channel. |
For ownership and connection prerequisites, review Shopify’s channel setup instructions.
Enhanced already includes CAPI. Do not assume that only Maximum supports it. Check Shopify’s data-sharing documentation for your channel’s options. If you also configure Shops, review its eligibility and verified-domain requirements; current Shopify guidance directs shoppers to your website to complete checkout.
Custom sites and other platforms
Use a supported, maintained integration or let the development team own the event definitions, destination IDs and deduplication rules. For WooCommerce, check the current Meta-published integration before installing another tracking plugin. Follow the platform’s supported event behavior rather than rewriting it simply to match a generic checklist.
11. Define and test the events that matter
| Event | Business meaning to verify | Check |
|---|---|---|
| PageView | A valid page view. | Correct destination; no unintended repeated sends. |
| ViewContent | A product or relevant content view. | Item IDs follow the catalog convention. |
| AddToCart | A successful addition to the cart. | Correct item and quantity; failed actions are excluded. |
| InitiateCheckout | The checkout-start action defined by your integration. | Shopify’s documented mapping includes clicking the checkout button; validate the actual supported behavior. |
| Purchase | The supported purchase event at the intended order state. | Order uniqueness, value, currency and refresh behavior. |
| Lead | A successful lead action in the chosen flow. | Success rather than an unsuccessful click; define CRM quality feedback separately. |
Deduplicate the same browser and server action
For an illustrative order O1042, the browser sends Purchase with eventID=order_O1042 and the server sends Purchase with event_id=order_O1042. Both go to the correct same destination. Use the same event name and matching event identifier for that action; do not reuse the identifier for different orders or actions.
Browser: Purchase | eventID = order_O1042
Server:  Purchase | event_id = order_O1042
Product: content_ids = ["sku_blue_m"]
event_id identifies the action; content_ids identifies the products. An email address, an order_id field alone or an Event Match Quality score does not replace correctly implemented deduplication. Check the Meta deduplication specification when building a direct integration.
- Use Test events to follow a product view, cart addition, checkout and controlled order. Inspect available Browser and Server parameters.
- Some partner integrations do not expose server events in the test panel. Also inspect normal event activity, integration diagnostics and deduplication information.
- Review Diagnostics, coverage, matching quality and freshness. Event Match Quality measures matching information, not order accuracy, deduplication rate or ROAS.
- Compare the order, amount, currency and items with the store backend. Events Manager reception and Ads Manager attributed results have different reporting scopes.
Follow one order from the store to Meta
Record the integration, destination ID, test time and time zone, consent state, order reference and purchased variant. Define the expected Purchase value using your integration’s documented rules before comparing amounts. Shopify describes order-value events using the order’s total price, including duties, taxes and discounts; do not substitute net product revenue without checking the definition. See Shopify’s event definitions.
- Store orderRecord the order, items and expected value.
- Event payloadCheck the event name, identifiers and currency.
- Meta event receiptCheck the destination and available diagnostics.
- Ad attributionReview separately; event receipt alone does not establish attribution.
Use the following worksheet for a real controlled order. Record observed evidence and mark unavailable checks as “Not verified”.
| Check | Expected result | Record during your test |
|---|---|---|
| Destination | The event reaches the dataset/Pixel in your asset register. | Expected ID, observed ID and where you checked. |
| Purchase and order | The supported purchase action corresponds to the controlled order. | Order reference, event name, event time and Browser/Server source when available. |
| Value and currency | The values follow the integration’s documented definition. | Expected and observed amount/currency; explanation for any difference. |
| Browser/server deduplication | If both send the same action, their event names and action identifiers match. | eventID / event_id where exposed; diagnostics and unresolved observations. |
| Product matching | Event item IDs follow the catalog’s variant or group convention. | Full event item ID, matching catalog item and content_type where applicable. |
| Repeat behavior | Revisiting or refreshing the completion page does not create another purchase outcome for the same order. | Repeated action, observed events and how repeats are handled. |
| Result and owner | Each discrepancy has a next action. | Pass or unresolved, issue, owner and retest date. |
An event arriving in Events Manager confirms receipt, not that Ads Manager will attribute a sale to an ad. If your integration does not expose an identifier or server event in Test events, record the limitation and use available event activity and integration diagnostics. Do not mark an unseen check as passed.
12. Build the catalog and connect product events
- In Commerce Manager, create or identify the catalog and verify the owner. Reuse the intended platform-synced catalog where appropriate.
- Choose the primary product source: platform sync, a supported data-feed file or another available method. Assign the refresh frequency and maintainer.
- Check item IDs, titles, images, prices, availability and destination URLs. Sample variants and out-of-stock products.
- Create product sets for the subsets you want to advertise, and assign the required people and ad-account access.
- Connect the correct event source when product-event matching is needed. Then inspect a real item’s complete ID in both the catalog and event.
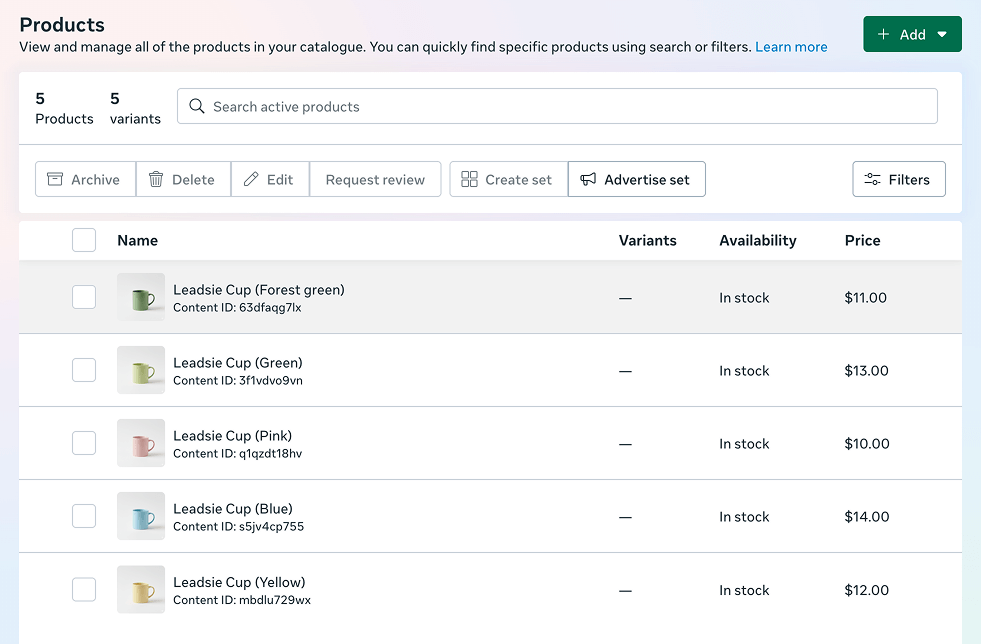
The catalog describes what you sell; events describe what people do with those products. If a catalog uses sku_blue_m and the event sends unrelated ID 1042, matching can fail. Check prefixes, capitalization, variant versus group level, and the integration’s content_type convention before changing IDs.
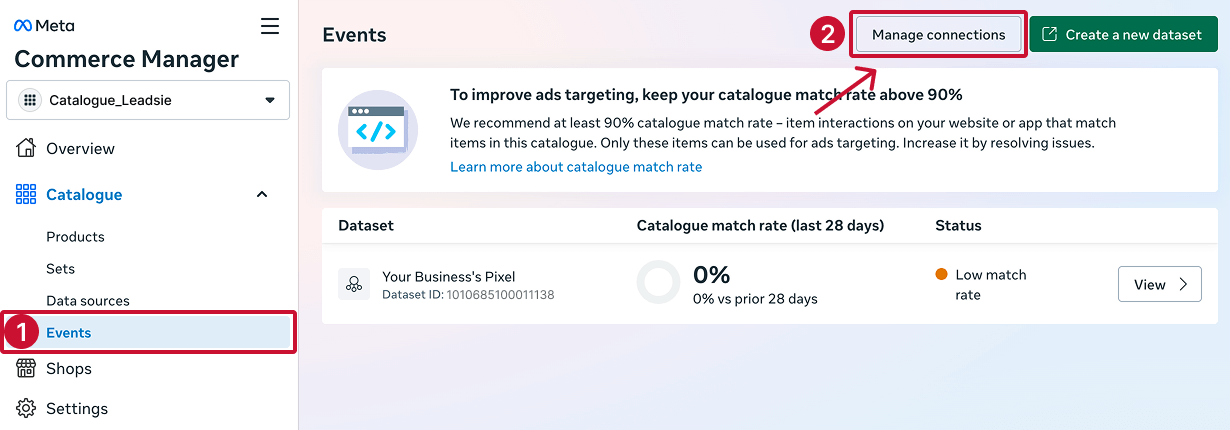
A catalog does not automatically enable a Shop. Shopify’s Facebook and Instagram features share a product catalog; make product changes in the primary platform source and check channel availability, because manual Meta-side edits can be overwritten by synchronization. After a repair, check feed updates, event activity and matching again.
13. Confirm which assets your campaign actually needs
| Business goal | Common foundation | Add when needed |
|---|---|---|
| Website sales | Brand identity, ad account, billing, store and website events. | CAPI, catalog, product sets and remarketing audiences. |
| Instant-form leads | Brand identity, ad account, form and lead-access permissions. | CRM delivery and lead-quality feedback. |
| Messaging | Brand identity, ad account and the selected messaging destination. | WhatsApp business account/number and customer-service coverage. |
| App promotion | Ad account, app configuration and an app-event solution. | SDK or partner integration, deep links and outcome feedback. |
Not every Meta ad requires a website pixel and catalog. Configure the assets for your actual conversion destination rather than treating the entire inventory as a universal prerequisite.
| Level | Main decisions | Asset check |
|---|---|---|
| Campaign | Objective and overall structure; budget placement varies by setup. | The objective matches the business result. |
| Ad set | Conversion location, audience, schedule, placements and optimization. | The intended dataset, event and eligible audience are available. |
| Ad | Identity, creative, copy and destination. | The Page/Instagram identity, links and previews are correct. |
For catalog advertising, verify the catalog and product set in the current creation flow. Custom Audiences define who may be reached; custom conversions define results from received events and rules. Lookalikes depend on an eligible source. In automated audience setups, confirm whether an input is a restriction or a suggestion.
Continue with the Meta Ads beginner tutorial once these checks pass. Its core sequence is to choose the business objective, configure conversion and audience settings, prepare the ad, inspect the preview and then monitor delivery. For channel roles, budgets and testing, use the full-funnel advertising planning tutorial.
14. Verify domains and maintain account security
When required for your chosen feature, open Domains under the relevant business settings and follow an available verification method, such as DNS TXT, an HTML file or a meta tag. Confirm the verified domain and owner. Domain control, business verification and a verification badge establish different things; none is equivalent to ad approval.
Domain verification is not a universal prerequisite for every ad. Shopify’s Shops requirements include products purchasable directly from a verified domain. Do not copy an old checklist that requires manually prioritizing eight web events for every current website campaign.
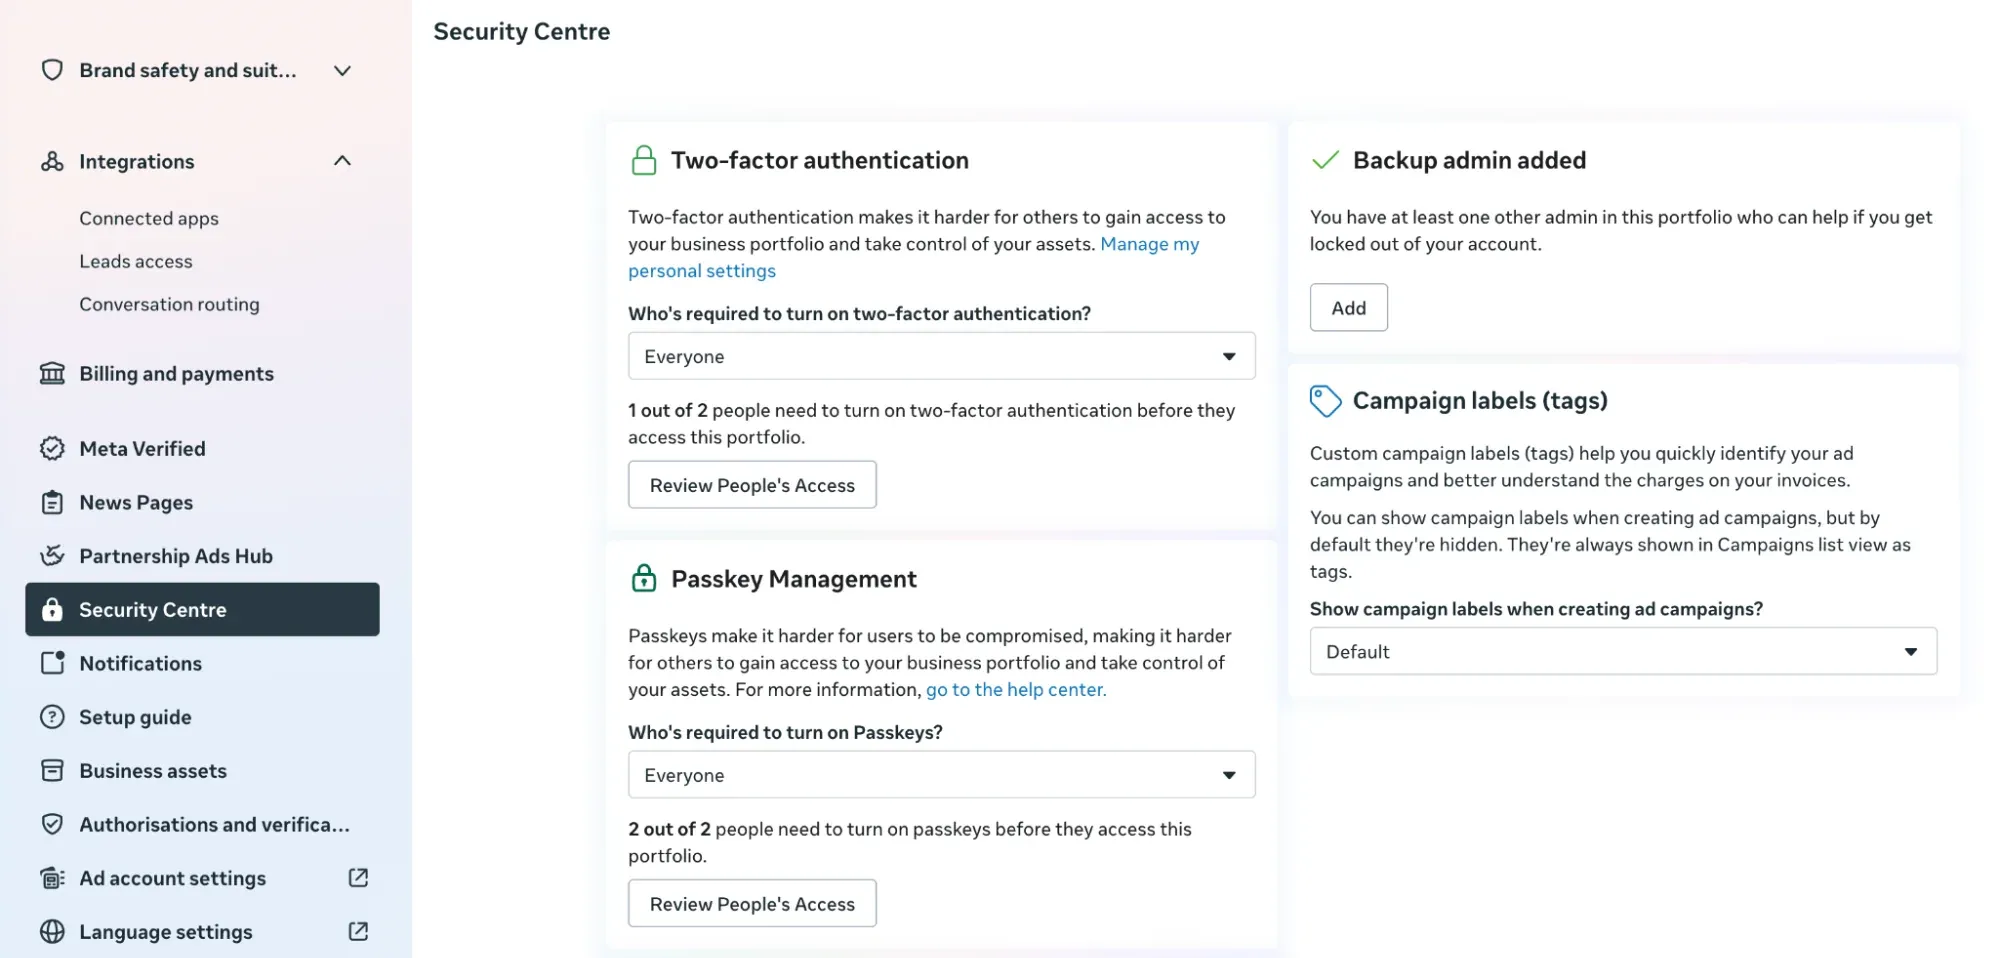
- Require appropriate two-factor authentication and keep recovery methods current.
- Maintain reliable administrator access while giving daily operators only their required tasks.
- Periodically review People, Partners, System users, connected apps and payment details. Remove expired access.
- If delivery is restricted, identify the specific affected person or asset in Business Support Home or the relevant status screen before attempting a repair.
15. Add advanced integrations only when the business needs them
For a direct API integration, an app identifies the application, a system user provides a machine identity, and an access token authorizes calls. Verify the app permissions and asset assignments together. Record the app ID, maintainer, allowed assets, credential location and rotation process; do not paste plaintext tokens into the ordinary asset register.
For WhatsApp, distinguish the business account from its phone number. Check the display name, connection method and message-handling arrangement. The Business App and Business Platform have different workflows; number migration and coexistence depend on the current supported process.
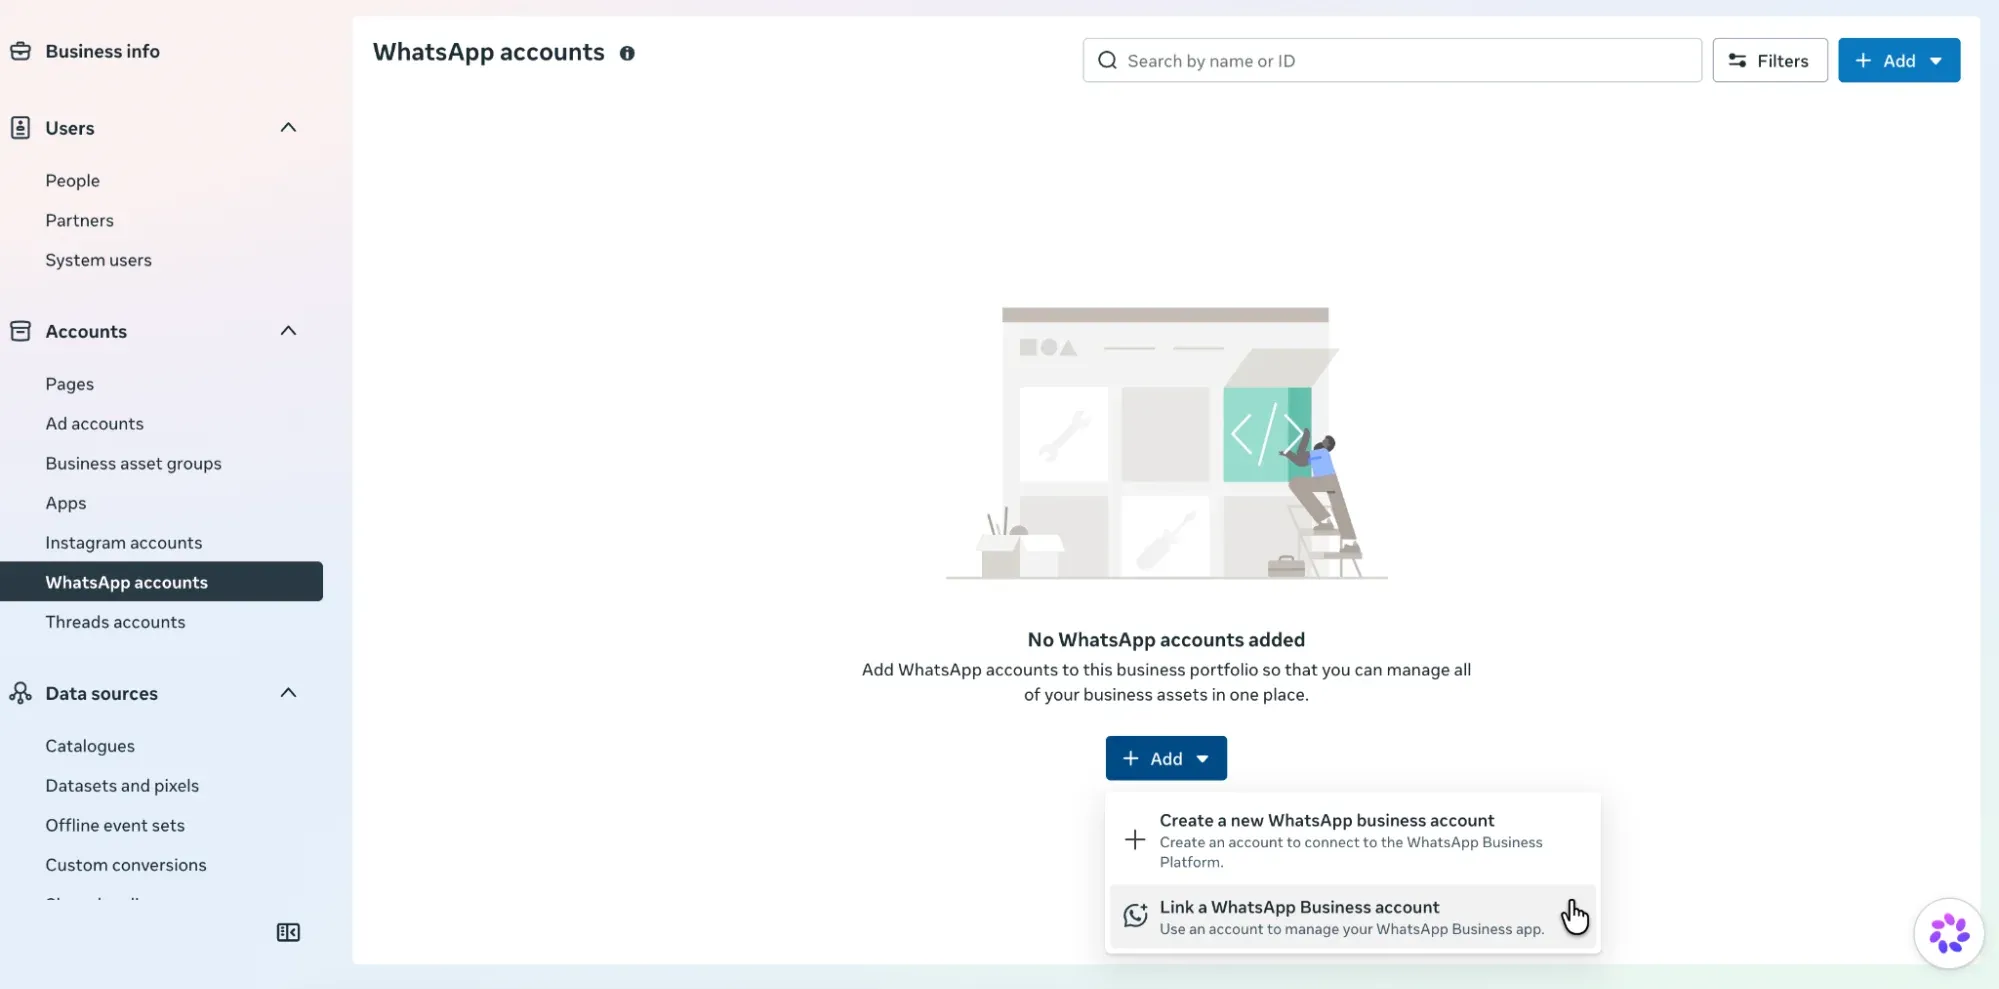
For leads, decide how the CRM will return quality and sales outcomes. For apps or offline transactions, choose an appropriate SDK, API or partner connection. Define the business outcome and maintenance responsibility first, rather than adding every integration before launch.
16. Run a launch test and prepare the handover
| Check | Evidence that it works |
|---|---|
| Ownership | Asset names, IDs and owners are recorded; owned and shared assets are distinguished. |
| Access | An operator completes the actual task using their own login; the business retains reliable administrative access. |
| Brand identity and billing | The intended Page/Instagram identity is selectable; account currency, time zone, payer, payment method and status are checked. |
| Events | The controlled journey produces the expected events, values, currency and items; duplicate sends are understood and handled. |
| Catalog | Products are usable, synchronization works, and the required event source is connected. |
| Destination and operations | Mobile pages work; orders, forms, CRM records or messages actually arrive; monitoring owners are assigned. |
Maintain one shared asset register
Use these columns in your spreadsheet: asset type, name, ID, owner, responsible person, people permissions, partner permissions, connected asset IDs, integration method, last test date, issue and issue owner. Store technical secrets separately.
An illustrative row might describe Brand_Main_USD as the brand-owned ad account, connected to Dataset_Web and Catalog_Store, with campaign access for the buyer and billing access for finance. Replace example names with real IDs and explicitly mark shared assets.
Before changing agencies, review live campaigns, automated rules, budgets, unpaid invoices and platform sync. Confirm the new team can operate the setup, remove former access as agreed, review apps and tokens, and repeat the identity, event and catalog tests.
17. Troubleshoot the missing relationship first
| Symptom | Check first | Next action |
|---|---|---|
| Can open the portfolio but cannot see the ad account | Selected portfolio, accepted invitation and assigned assets. | Compare both IDs and have an authorized administrator correct access. |
| Page or Instagram identity is missing | Owner, Page–Instagram link and advertising permissions. | Identify the missing asset in the ad identity selector. |
| Dataset or optimization event is unavailable | Correct data source, ad-account access and setup eligibility. | Test incoming data, then check connections and campaign settings. |
| Orders exist but events are missing | Trigger, consent handling, integration, destination ID and delivery path. | Trace one controlled order end to end. |
| Too many purchase events | Duplicate installations, deduplication, repeat triggers and test orders. | Compare event names/IDs and refresh behavior. |
| Low catalog matching | Event source, content_ids, variant/group rules and product state. | Compare one complete item ID across the event and catalog. |
| Ads or payments fail | Restricted object, payment status and ad review. | Read the specific status explanation and follow the relevant support flow. |
| Setup breaks after an agency change | Ownership, former credentials and service dependencies. | Restore authorized access or rebuild the specific connection. |
Record the current IDs and connections before making a change. Fix one identified issue at a time, keep a change log, and repeat the same test journey. This gives you a usable advertising setup and a record the next operator can understand.